|
I have been wanting rear disc brakes
on my 85 C10 for a long time. I have looked at all the kits you can
find on the net and never really liked what I saw. For one thing,
they only use three bolts to mount the bracket to the axle flange and the
brackets look a little on the wimpy side to me. So, I found a set
of plans on Ebay to make your own mounting brackets. The drawings
were real detailed and designed with AutoCAD. There was only one
thing, they were mostly designed for 4x4's. I knew this when I bought
them but I needed the dimensions for everything. The off road guys
seem to like the calipers mounted as high up as they can to help with mud.
This is OK I guess, but it has it's drawbacks. For one, the calipers
need to be mounted with the bleeder fitting at 12:00 so all the air can
be pushed out when bleeding the brakes. If it's not, you will end
up with a spongy pedal. So, I had to redesign the mounts to where
the calipers would be moved to a more horizontal position or more like
the front brakes. I have been reading tons about this mod everywhere
I could find anything. There is quite a bit out there about doing
this. Some folks kept the stock disc/drum master cylinders and added
a proportioning valve to adjust the bias to the rear discs. Then
you have the trouble of not having enough brake fluid to the rear because
of the smaller rear reservoir in a disc/drum master. Besides, the
stock disc/drum brakes have built in residual valves for the rear brakes.
This will cause disc brakes to drag. A residual valve is needed for
drum brakes to hold pressure on the shoes so they are kept close to the
drum. This won't work with disc brakes. So, after reading and
doing lots of investigating, I decided to do it right. More expensive
over using some of the stock stuff, but I like the satisfaction of knowing
it will be done properly, especially when it comes to stopping. I
decided to go with the 80-85 Cadillac Seville calipers so I would still
have a park brake. The Seville calipers are by far the most expensive
calipers to use, but there is no other way of having a park brake that
I know of, except maybe for a driveshaft brake or something similar.
Anyway, here is a list of the parts I used.
List of parts I used: Disc/disc master cylinder #MC390545P
Master Power Brakes
Misc. things needed: Axle seals: For my 85 10 bolt
I used some Federal Mogul #8835S from
Advance
Auto Parts
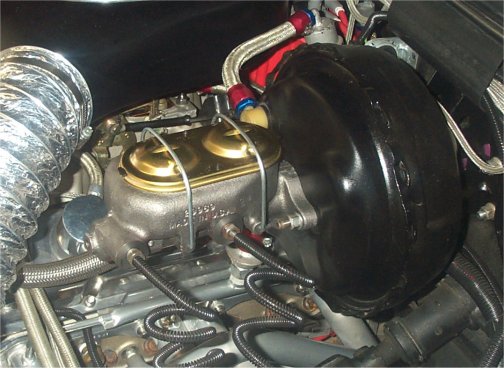
Getting started: First I know there are many different ways of doing this and using different parts to substitute for what I used. I wanted everything to be as simple of a swap as I could make it. I also wanted all new parts, so this will be wrote using the parts I bought and the way I designed my conversion. First thing to do is remove
all the old not used pieces. I started up front in the engine bay.
Use a syringe to siphon the brake fluid from the master cylinder.
Take the brake lines off the master cylinder. Be prepared to catch
any fluid that comes out and remember, it does remove paint. With
the lines off, take the master cylinder off. Next, you will need
to remove the combination valve. It's mounted to the radiator cradle
up under the fan shroud. Mine was easy to get to since I have electric
fans and my shroud isn't used. If you still have a shroud, I highly
recommend removing it. This will make it a ton easier to get to the
valve. A note here. Whenever removing any brake lines, use
brake line wrenches. This will keep you from rounding or stripping
any of the line nuts. Don't forget to unplug the brake warning light
wire from the valve. After these old pieces are off, you can bolt
the new stuff back in it's place. Be sure you follow the directions
that came with the new master on how to bench bleed it before mounting
it to the booster. Once it's bench bled, bolt it on. Hook up
the brake lines. This new master has the brake lines reversed.
The fitting for the rear brake line is toward the booster to where on the
stock one, it was toward the front. No biggy. The lines are
easy to switch without kinking them. The lines at the valve go back
on the same ports as they were on the stock one. Everything here
is pretty straight forward, except for having the switch the hard line
ports at the master.
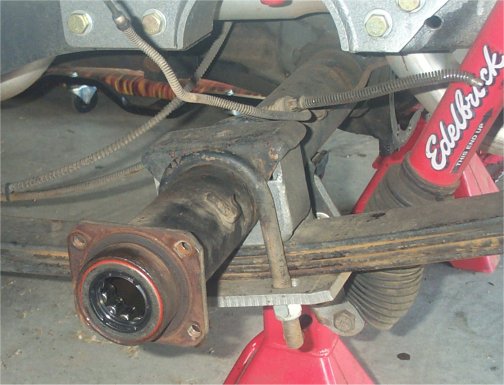
Now to the back of the truck.
Jack the truck up and put it on some good jack stands. Remove the
wheels/tires of course. Brake drums are next. Get under the
truck with a drain pan and take off the differential cover and catch all
the old grease. Rotate the axles until you find the pinion shaft
retaining bolt. Remove the bolt and pinion shaft. Once the
pinion shaft is out, push in on the axles and take out the c-clips.
You may need to turn the axles to see the clips, but once you see them,
they will probably just fall out. Now you can slide out the axles.
If you plan on reusing the old seals, be careful not the mess them up when
taking the axles out. Do yourself a favor and spend the money for
new seals. Cheap insurance to maybe save a leak later. You
sure would hate it if you had to pull the axles out again. Once the
axles are out, take the brake line loose from the wheel cylinder.
Remove all the drum brake hardware. Take the park brake cable loose
from the backing plate and brake lever. Now, remove the 4 bolts/nuts
holding the backing plate on. That's it. Now we are ready to
start putting the new stuff back on. It should now look similar to
this.
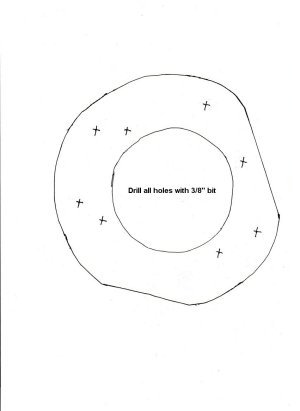
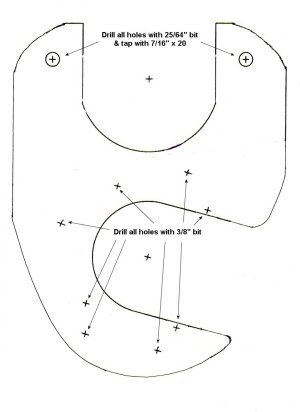
Making the brackets: OK. Here's the hard part.
Making the brackets. For this you need some 3/8" plate steel.
You need two pieces 8" x 12" and two pieces 8" x 8". Here are the
templates. These are just small pics to use on this page. To
download a zip file of full size templates, click
here.
You print out the full size template
first thing, then transfer it over to your steel plate. I have instructions
on how to print them in the zip file you download. You may notice
the templates are different than the brackets I have photos of below.
I checked my 15" rally wheels to see if they would fit. Well, they
hit on the corners of the bracket at the caliper mounting bolt holes.
So, I changed the templates so they wouldn't hit. The calipers are
real close to the wheel, but I think they will clear. How you cut
everything is up to you. With my 17" wheels, I don't have a problem
so I left my brackets the way they are. I used a 4-1/2" side grinder
with a cutoff wheel, or rather several cutoff wheels. For the big
holes, I had a machine shop cut them with a plasma cutter. A cutting
torch could be used, but it makes a big miss and a lot more work for you
to clean everything up later. Anyway, once you have everything cut
and the bolt holes drilled you can test fit them. One thing to make
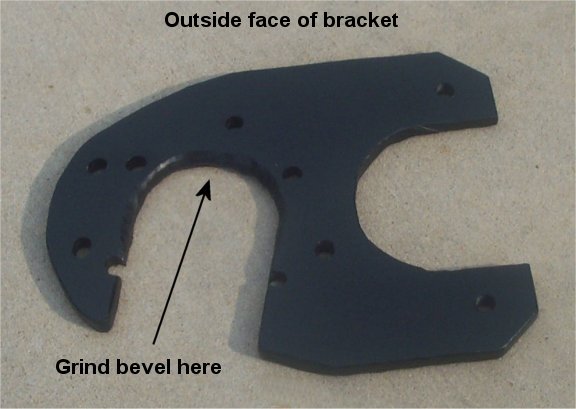
note of. You will need to bevel the notch where it fits over the
axle tube. If you look behind the axle mounting flange, you will
see where it's welded on to the tube. The bracket fits the axle tube
pretty tight so you need to grind a bevel on it so it fits up against the
flange tightly.
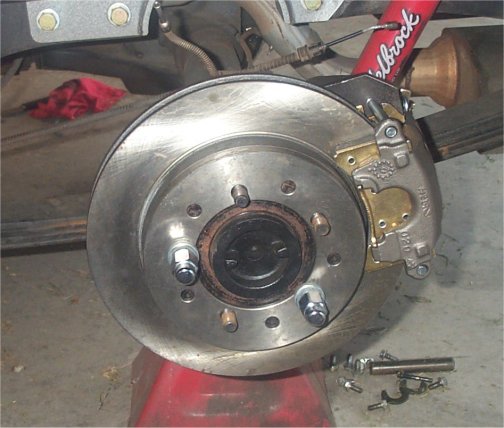
The caliper mounting holes are tapped
to 7/16" x 20 thread. Use a 25/64" bit and then tap them out.
Make every effort to drill and tap the holes square and straight.
If they are crooked, the caliper mounting bolts won't go in the caliper
very good and will cause drag on the rubber bushings. The other mounting
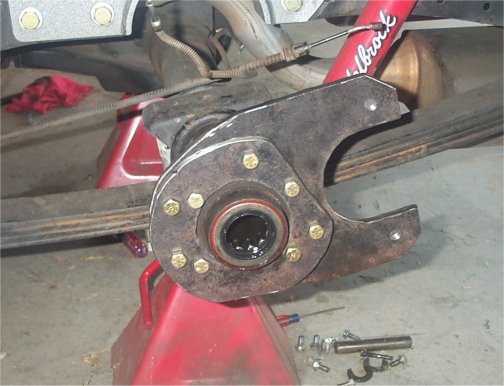
holes are all 3/8". Below is how the brackets look when mounted to
the axle housing. This is on the drivers side. The inside bracket,
or primary as I call it, goes on the inside of the axle flange, the secondary
bracket goes on the outside. Four bolts go through the flange and
four are not. The outside bolts must use a spacer between the brackets.
I found regular 3/8" nuts worked perfectly. I just clamped them in
a vise and drilled out the threads to 3/8". For the hardware, I used
all grade 8 stuff. Once you get them bolted to the axle flange, slide
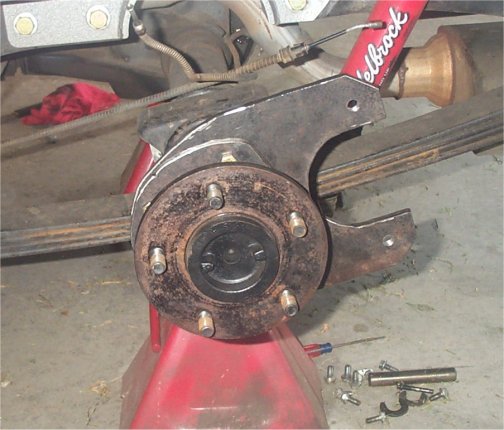
the axle back in. Stick the rotor on and use a couple lug nuts to
hold it on. Then mount the caliper with pads, to the bracket.
The calipers need to go in the bracket notch easily, but not be sloppy
It needs to fit the square edges of the notch fairly close. Check
the clearance all the way around the caliper. You don't want any
part of it rubbing the bracket. Make sure the bolts clear the rotor
and you have equal spacing at the bolts on both sides close to the rotor.
Next check to make absolutely sure the pads are touching the rotor face
evenly. This is a must because if it's not, you will have uneven
pad wear. When and if everything checks out, you can pull everything
back off and get it all painted up.
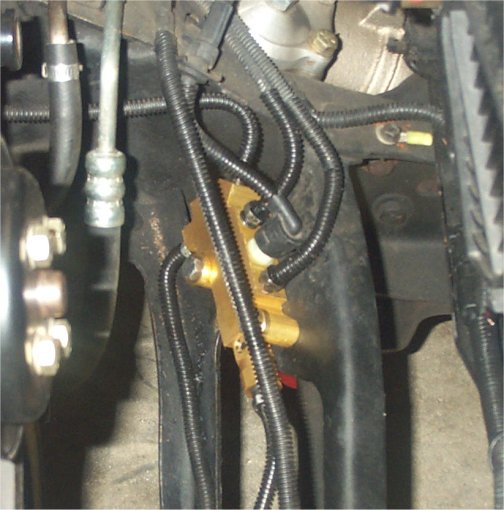
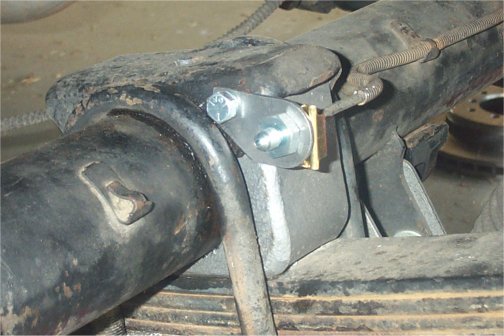
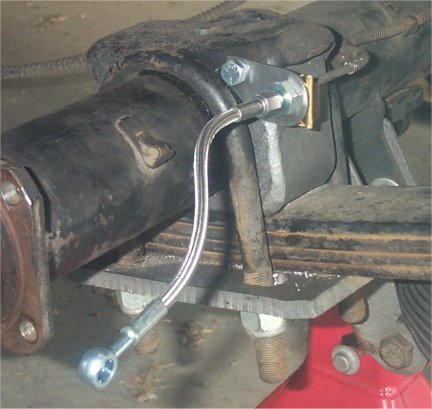
Brake lines: While the caliper mounting brackets
are drying, let's get the brake lines fixed. I bought the brake line
kit from Streetrod Manufacturing. The kit comes with stainless braided
hoses, complete with washers, mounting bolts, brackets and clips.
Below is how it looks mounted.
With the location of the caliper
brake line mounting hole, I found this to be the best location to put the
mounting clip/bracket. I used a 5/16" bolt to hold it. I tapped
the hole to fit the bolt. My bolt was a 5/16" x 18 thread.
I guess you could weld them on if you wanted to. As you see, I have
a flip kit on my truck, but I think this will work if the axle is still
under the spring like stock. You will need to cut the hard line and
re-flare it. For this, mark the line where it needs to be cut.
Then remove it from the truck to make it easier to work on. There
is a spring wrap on the line that needs to be cut back out of the way.
Once the spring is cut back, cut the line where you marked it. Use
a flaring tool kit for this. Slide the line nut back on the line
and use a double flare. A single flare won't work on brake lines.
It will leak every time. As a side note, if you don't feel like messing
with the old hard lines, you can buy new ones in generic length for cheap.
After cutting and re-flaring my old ones they leaked. I went to Advance
Auto Parts and bought 2 new ones, 30" long. They come with new line
nuts and are already flared. For the drivers side, 30" is about perfect.
But, the passenger side will need to be cut. They were $3.48 each.
So, if you don't have any success at cutting the old ones, it won't break
the bank to buy some new ones. The braided hoses come with an adapter
to make everything a breeze to hook up. Put the adapter in the hole
of the bracket and put the clip on to hold it in place. Once you
get the hard lines cut and re-flared, you can hook them back up to the stock
tee fitting and the new bracket.
Installing everything: By now, all the parts you painted should be dry, so let's get start putting everything together for the last time. First thing, you need to install the caliper mounting brackets. Then put the axles back in, put in the c-clips and pinion shaft and bolt. To install the axles, slide them in all the way, put in a c-clip with the open end going in. You will need to pull out on the axle so the clip will stay. Do the other axle the same way. Then install the pinion shaft and bolt. Put the rear cover on with a new gasket. Put in the gear oil. Now we can mount the rotors and hold them in place with a couple lug nuts for now. Bolt the calipers to the brackets. For the flexible brake lines, put a copper washer on the banjo bolt, put the bolt through the hose and the other copper washer on the bolt, the fasten it to the caliper. A word of warning here. If you paint the calipers like I did, make sure the hose fitting area on the caliper is clear of any paint. If you are unlucky like I was with this, it will leak. I went through all sorts of crap until I checked to see how the caliper surface was. Now we have to hook up the parking brake cable. It is a must for you to have a working and properly adjusted parking brake with the Seville calipers. It is also a must to use the parking brake every time you park the truck. These calipers are not like a normal non parking brake caliper. A regular caliper is auto adjusting. Not true with these. The parking brake is what keeps them adjusted to the proper distance. Here is some important maintenance information about the rear Cadillac Calipers: If you are using Cadillac ElDorado/Seville rear calipers there are some important things you should know. One of the biggest advantages of a disc brake system is the fool proof self adjuster. Not so with this rear GM system. The rear calipers adjust off the parking brake. The parking brake is incorporated into the caliper. You must set the parking brake every time you park the car. The rear caliper pitons utilize a one way clutch inside the caliper piston. When the parking brake is applied the clutch senses when there is .030" or more clearance between the friction material and the rotor on the inboard side. When there is more than .030" the clutch turns inside the piston adjusting it out keeping the rear brakes adjusted. If you do not set your parking brake every time you will start to lose brake pedal (low and spongy) and the adjuster mechanism will not work any longer. Also: never use rebuilt calipers on the rear because the rebuilt units use the old pistons and the pistons were the reason the caliper failed in the first place. First thing we need to do before
hooking the cables up to the calipers is adjust the park brake on the calipers.
They came with a how to instruction sheet, but I'll post it here to.
Adjust Caliper Parking Brakes The GM rear caliper with integral
parking brake is self-adjusting when you use the parking brake. As
the pads wear it will click to the next stop, but they do not always work
and they will not work if you do not use your parking brake. To adjust
the parking brake the fast way, remove the arm and turn the shaft as far
as possible and reinstall the arm.
Rear Caliper Parking Brake Lever Adjustment Note: This procedure
must be performed as part of the rear caliper replacement operation.
Failure to adjust the parking brake lever, before you apply the hydraulic
brakes, can result in no parking brake and possible premature brake wear
or damage.
1. Push the lever to apply the parking brake. Each time you push the lever it should move less. Push until the lever only moves 1/4" from the stop. Go to step 2 if this does not work. 2. With parking brake lever removed, tighten adjusting shaft using a 9/16 wrench until pads are tight against rotor. 3. Put lever arm on adjusting shaft as close as you can to the stop. If the arm is no more than 1/4 inch from stop, proceed to step no. 6. 4. Remove Master Cylinder lid, fluid level should be 1/2 full. Compress piston away from the rotor by using a pry bar or large screwdriver between the caliper and the disc pad. 5. With the screwdriver still in place, use 9/16 wrench to turn the shaft in opposite direction of the parking brake cable. Turn screw about 1/4 turn. Now move shaft back to the tighten position. 6. Attach lever arm and check the location to the stop. If arm is still more than 1/4 inch from the stop, repeat step no. 3 through no. 5 until the correct arm position is obtained. 7. Attach the emergency cable and spring. proceed with final adjustment of brake calipers.Note: Make sure Master Cylinder is full of approved brake fluid prior to road testing of the vehicle. Note: An easy test for
proper lever position is to grasp the brake pad and try to shake it. If
any rattling is heard, the parking brake lever requires adjustment.
OK, so after you get the park brake adjusted, it's time to work with the cables. Here's the bad part, the stock cables won't work right. I hooked mine up but it was tough. First thing, the drivers side is too short. You can hook it up but it raised the pedal way up inside the cab. Then the passenger side is too long. I cut mine off and made a clamp with a 3/8" bolt and nut, with a hole drilled through the bolt. This worked, but looked tacky. Next, I find you can't get the drivers side caliper off the brackets with the cable hooked up. So, I unhooked it to get it off, but it is about impossible to get it back on unless you take the passenger side off too. I got totally ticked off and ordered some new custom cables. These are expensive, but so has everything else been with this conversion. The new cables are nice. The work great and will let you take the drivers side caliper off without unhooking them. Anyway, how you get this to work is up to you, but it is a must to have them working or your expensive calipers will soon be toast. After you get the cables installed,
you will need to adjust the passenger side. It's the only one with
an adjustment. Apply the park brake to make sure both sides are working
evenly. You can tell by looking at the lever on the caliper.
The gap from the lever to the stop should be the same. If not, you
will need to adjust the passenger side cable. On my 85, the brake
cable is on the drivers side, with the junction right under the gas tank.
You will need to use a pair of vise grips to hold the cable while you turn
the adjusting nut. Tighten it up and keep checking the gap.
While adjusting, release the park brake first. Adjust it, reapply,
and check gap. Keep going until the gap is close to the same.
Make sure when the brake is released, the brake arm on the caliper is against
the stop. Once this is done, it's time to bleed the brakes.
While bleeding, check for leaks at all locations. I hope you have
better luck than I did on the leaks. Also, don't over tighten the
caliper bolt when you put it on the caliper and make sure to remove any
paint. If you over tighten the banjo bolt, you will mess up the copper
crush washers and it will leak. It will take a while to bleed the
rears since they will be full of air. I won't go into how to do this
here because I assume you know how. Anyway, when you get done bleeding
it's time to take it out for a spin. Drive slowly at first and apply
the brakes gently. Make sure you have a good pedal and no pulling
from side to side or the rears locking up.
Just a little info: Everyone has been asking what this costs. Well, it's not cheap. I have read where you can use a master cylinder from the 77-78 Seville, along with the combination valve and come out cheaper. I would guess it's true, but you end up with cheap Advance or Autozone rebuilt stuff. Personally, I've been through this cheap stuff before. I didn't want to buy cheap stuff and have to replace it every few weeks. Here's what everything cost me. I won't include shipping or tax since this may be different for you anyway. Master cylinder - 119.95
Total - $857.11 Then you will have brake fluid, gear oil, cutting/grinding wheels and maybe a few other misc. things. So there you have it. Check
Streetrod
Manufacturing's website for some good tips and troubleshooting steps
if you have problems. Good luck if you decide to give this a try.
It's a hard job but well worth it in the end.
Mike Ervin
|
||