This is a “how-to” article on how I installed my
Autometer Ultralight gauges into my ’73. As
many of you may agree, the stock gauges and dash lights on 73-87 GM trucks have lots of
room for improvements. The gauges themselves
are not completely accurate (as with most stock gauges in older cars/trucks) and can be
difficult to see and read due to a rather poor lighting design from GM. The following steps will show you how to install
aftermarket gauges just about any truck, Suburban, or Blazer of the 73-87 (88-91)
vintage. Here is a list of the following items you will need to perform this
upgrade… Gauges Misc. Tools The first thing I did was to enlarge the gauge openings in my stock
dash bezel. I am sure there are several ways
to do this, I will explain my method. I
turned the bezel over and drilled holes completely around the gauge openings from the back
side, leaving a small gap between each hole. If
you drill too close to the previous hole, you risk the chance of the drill bit
“jumping” around and possibly causing unwanted damage to the bezel. Once I drilled completely around the stock
openings, I used a hobby saw to “connect the dots” for lack of a better term. Once you have carefully sawed all the way around,
the inner face of the stock openings should just fall out.
With those removed, simply get some sandpaper and smooth out the rough edges on the
bezel. Granted, you will not see this part of
the bezel once the modification is complete, but finishing it off completely will give you
a better piece of mind and the overall fit and finish will be second to none. When finished, it should look similar to
this.
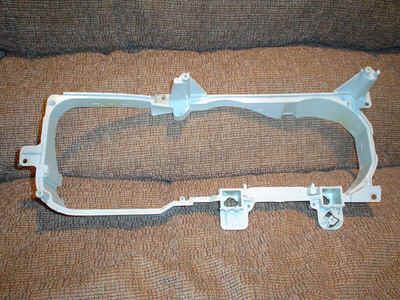
Now that your stock bezel has been modified, you will need to do the same to the gauge cluster housing. Because aftermarket gauged are larger and deeper that the factory ones, they will not fit into the gauge cluster housing. To modify your cluster housing to work, you will basically need to cut off the entire backside of it, I used a dremel with small cut off wheels for this. This is a little tricky and will take a little getting used to, so take your time and don’t rush it. Before you start cutting, you will first need to remove the factory gauges, circuit board, bulbs, and all hold downs on the backside. Once the housing is completely bare, you simply cut along the sides (with your dremel) parallel to the rear of the housing, all the way around. Take your time because the plastic will melt a little and become hot and the cut off wheels will break easily if pushed too hard. Unfortunately, cutting off the rear of the housing will not complete the task, most of the inner pieces are molded in a little further to the front thus causing it to stay attached. These areas can be a little tricky to remove because of their location, but if you remove bits and pieces a little bit at a time, eventually the entire inner and rear structure of the housing will be removed. Once the unwanted plastic is removed, spend some time sanding the rough edges to give it a finished look and feel. Here is how it should look when finished
The next step is the most difficult but also the most important part
of this process. You will need to purchase an
aluminum overlay for your stock bezel, here is where I purchased mine. Once you have this overlay, you will need to
modify or machine it to clear your aftermarket gauges.
You can either do this with a dremel and a very steady hand, or you can find
a local machine shop and have them do it for you. I
chose to have mine machined out simply because I did not want to risk scratching or
ruining my overlay. Once the three modifications described above are complete, you can
then install the gauges into the aluminum dash bezel.
One thing to look out for, the two gauges to the very left of the bezel
cannot be installed until the gauge cluster housing and dash bezel are installed into the
actual dash of the vehicle. Because of the
gauge size and angle of the dash, you will not be able to slide the aluminum bezel over
the dash bezel with them installed…they will have to be installed separately. The location of the gauges is ultimately up to
you, I opted to place mine in the same location the factory placed them in tach dash
equipped trucks. The following step is optional, but I highly recommended it. I purchased a Painless gauge
wiring harness to wire in my gauges. The
benefit of this is the fact that it is completely pre-wired, all you have to do is put
terminals on your gauges and the harness and plug them in…that’s it. The rest is basic wiring to your fuse box and
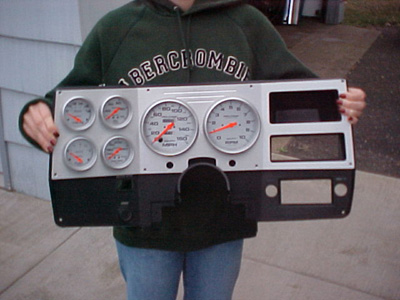
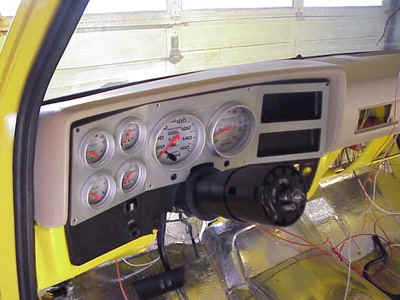
sensors/fittings. The final step is to install the gauge cluster housing, dash bezel, and finally the gauges onto the truck. Once the gauges are in, all that is left is to install your turn signal indicators, high beam indicator, and wire everything up. Here are a couple pictures, the first is a picture of my assembly (my fiancé is the model) before it was installed in my 73, and the other was after the install.
Keep on truckin!
|